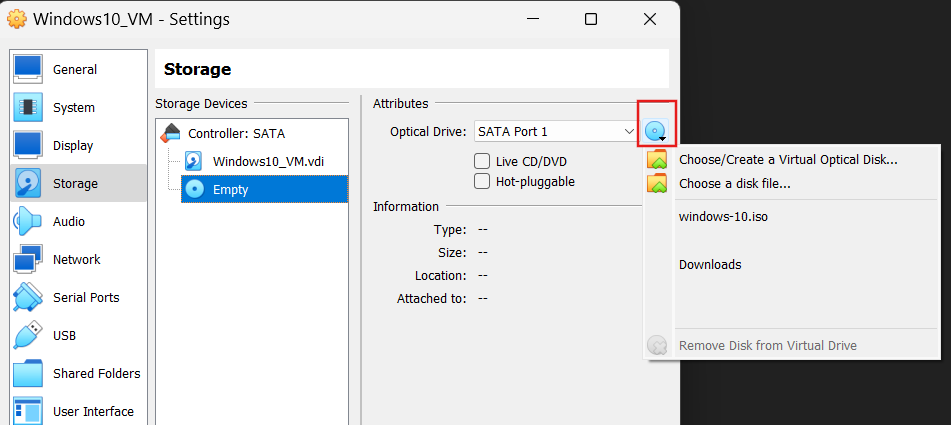
How to Install Guest OS in a Virtual Machine

There are many occasions when you would need another OS to proceed with your work. Maybe some software requires you to have Linux, or maybe a security course you enrolled in requires you to have Kali Linux installed. Would you purchase a new dedicated computer or fresh install a new OS onto your machine? The solution to this is Virtual Machines (VMs).

What is a Virtual Machine: A Practical Example

Suppose you have Windows as your primary OS on your computer, and now you must have Linux installed. One way is to purchase a new hard disk or USB, make it bootable, and run your Linux from there. Another way is to delete your current OS and install Linux, and when you no longer need it, install the previous OS again.

Both options are inefficient. The first requires you to spend money buying new hardware equipment, and the second wastes time installing operating systems. What if you suddenly need your previous OS again? That is where VM comes into play.

Simply put, a VM is a software (called a Hypervisor) you can install, allowing you to install a new OS within it. It will create an environment that mimics an actual computer running another OS. This way, you would not have to spend money buying hardware equipment, and you can run multiple OSes simultaneously.

Things You Need to Get Started

You only need three things to install another OS parallel to the current one.

  • Hypervisor (VirtualBox from Oracle, for instance)
  • ISO image of desired OS
  • Free space on your system

Install Guest OS in a VM

Step 1: Get an OS Image File

First, you need to download an image file for your desired OS.

Step 2: Create a VM

  • Download and install VirtualBox from Oracle. 
  • Download and install the ‘VM VirtualBox Extension Pack’ from the same webpage. 
  • If you are currently on Windows 10/11, you must first deactivate the built-in Hyper-V feature to avoid interruptions. Navigate to Windows Security -> Device Security -> Core Isolation Details -> Turn off Memory Integrity
  • Open the command prompt as administrator and type “bcdedit /set hypervisorlaunchtype off”.

  • Restart your computer and launch VirtualBox.
  • Click the ‘New’ button.

  • It will ask you about the following parameters.
    • Name that you want for your VM. 
    • Path to the .iso image file. 
    • Type of the OS.
    • Version of the OS.

  • Click ‘Next’.
  • Allocate the RAM and number of processors for your virtual machine. Select according to the OS’s requirements, as every OS has different requirements.

  • Next, allocate the hard disk size for your virtual OS. This is the storage capacity you will get for your guest OS. 

  • Click ‘Next’. A summary will be shown to you.

  • Click ‘Finish’.
  • You can see the newly created VM in the left pane

Step 3: Install OS into the VM

The VM is properly set up. Now, we need to install the OS. Follow these steps to do so. 

    • Launch VirtualBox.

    • Click on the newly created VM. 

    • Click on the ‘Settings’ icon.

  • From the left panel, tap ‘Storage’
  • Tap on ‘Empty’ and browse to the .iso file. 

  • Click ‘ok’.
  • Select your newly created VM again and click on ‘Start’. It will start the installation process. 
  • Follow the on-screen instructions to install the OS.

That is it. Your guest OS is ready to be used.

Conclusion

There are many times when you require a secondary operating system to be installed on your computer. You would not need a separate hard disk for your new OS. Instead, you can use virtual machines and still benefit from the best features of the existing and new OS.

With the detailed instructions above, you can install and run as many OSes as you want simultaneously without buying a new machine.

Awais Saeed

Was this Article Helpful?

Did I just helped you solve one of your problem? Support me by buying me a coffee. Thanks for your support

Leave a Reply